Hi People
In this tutorial, I will explain how we can directly test our android applications on a real device (from Eclipse)
It is a reasonably easy process. It involves the following steps:-
Install the appropriate USB driver for your phone:
The first step is to install the suitable USB driver to connect your device to the system. As such it depends on your phone model where to get the USB driver for it. The android developers website's USB drivers guide can direct you where to go to get your drivers.
http://developer.android.com/tools/extras/oem-usb.html
There are chances that the USB driver is already installed on your system if you have installed some PC connectivity software to connect your device to the computer like PC Companion for Sony phones and Kies for Samsung ones. Otherwise you can get the drivers using the link given above.Turn on USB debugging on your phone:
Once the drivers are installed , the next step is to turn on USB debugging on your phone. The process depends on the android version that your phone has.For Icecream Sandwich-
For this , in the phone menu, go to Settings ---> Developer Options----> USB debugging and check the box next to it. See the screenshot below:
For earlier versions-
The menu options might be a little different and the path might be something like this: Settings ---> Applications ---> Development ---> USB debugging
- Connect your phone to the computer via the USB cable.
To check whether your device is ready to be used for testing android apps, follow the following steps:
- Open cmd
- Navigate to the platform-tools directory inside your sdk folder
- Execute the command "adb devices" there
- You should see a list of devices . If there is a device whose name consists of combination of capital letters and digits , your phone is successfully connected to the system
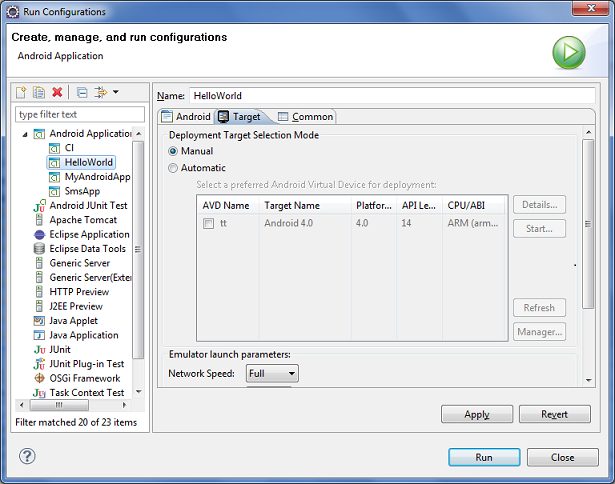
You would have created one or more AVD's using the Android Virtual Device Manager, which you will be using for testing your apps. Even if your phone is successfully connected and ready for testing your apps through eclipse, it wont automatically be used for testing the app because by default , the deployment target selection mode in eclipse is set to automatic and you would have created certain AVDs for that purpose. Hence if you simply right click on a project;run as android application, it will again start the deployment on the AVD(emulator).
To overcome this, you have to change the deployment target selection mode to manual.
For doing this , follow these steps (see screenshot below):
- Right click on your android project.
- Click run as. Then navigate to --->Run Configurations--->Android application---> Your application
- Go to the target tab. Select the deployment target selection mode as manual

The running app on the phone
Comments and suggestions are welcome.


